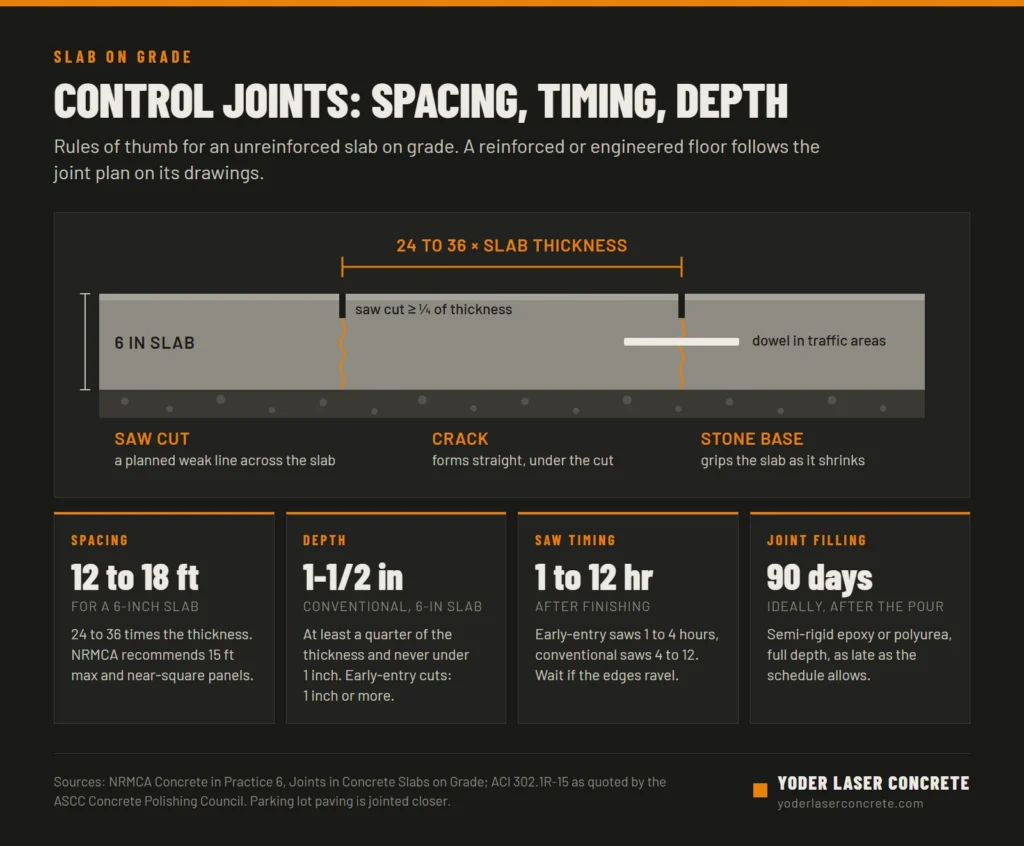
Control joints are planned cracks. They are shallow saw cuts or tooled grooves that give a concrete slab a weak line to crack along, so it cracks in a straight line under the cut instead of wherever it likes. For an unreinforced slab on grade, the usual rule is to space them 24 to 36 times the slab thickness, about 12 to 18 feet for a 6-inch slab with 15 feet a common upper limit, saw them within hours of finishing, and cut them at least a quarter of the way through (early-entry saws cut shallower, at least 1 inch). On a warehouse floor, where forklifts cross every joint thousands of times, the joints also need load transfer and the right filler.
Why concrete cracks
Concrete shrinks. It loses a little volume as it sets and hardens, more as it dries over the following months, and it also grows and shrinks with temperature. On its own that would be harmless, but a slab is never free to move. The base underneath grips it, and walls, columns, pits and footings hold it in place. Concrete is strong when squeezed and weak when pulled, so as the shrinking slab is held back, tension builds until it cracks.
You can’t stop that cracking, but you can decide where it happens. A control joint cuts a weakened plane into the slab, the crack forms neatly underneath it, and the floor ends up as a grid of panels with straight joints that are easy to maintain. The National Ready Mixed Concrete Association calls joints “simply pre-planned cracks.” Control joints are also called contraction joints; the two names mean the same thing.
Control joints vs expansion and construction joints
A slab on grade has three kinds of joints, and each does a different job.
| Joint | What it does | Where it goes | How it is made |
|---|---|---|---|
| Control (contraction) joint | Makes the slab crack in a straight line where it was planned | In a grid across the slab, lined up with the column lines | Saw cut, tooled or formed with a plastic strip |
| Isolation joint (often called an expansion joint) | Separates the slab from things that move differently, so each can move on its own | Around columns, along walls and footings, at pits and drains, where paving meets a building | A full-depth strip of foam or asphalt-impregnated fiber board, or a boxout poured later |
| Construction joint | Marks where one pour stops and the next starts | At the edge of each day’s placement, planned before the pour | A formed edge against a bulkhead, doweled where traffic will cross |
What most people call an expansion joint in a slab is really an isolation joint. Older paving often had expansion joints every 25 to 50 feet, but the Federal Highway Administration’s position, as quoted in NRMCA’s concrete parking lot FAQ, is that well-designed contraction and construction joints have made them largely unnecessary, except where concrete meets a fixed structure.
Columns get special treatment. A square boxout around each column is turned 45 degrees, like a diamond, so the control joints meet its corners instead of running into its sides, and the boxout is filled with concrete after the floor has hardened. NRMCA also advises against L-shaped panels, because cracks tend to start at inside corners.
How far apart control joints should be
The common rule for an unreinforced slab is a maximum spacing of 24 to 36 times the slab thickness. An easy way to work it out: 2 to 3 times the thickness in inches gives the spacing in feet. NRMCA recommends going no further than 15 feet whatever the thickness, and keeping panels square or close to it, with the long side no more than 1.5 times the short side.
| Slab thickness | Interior floor (24 to 36 times the thickness) | Parking lot paving |
|---|---|---|
| 4 inches | 8 to 12 feet | 8 to 10 feet |
| 5 inches | 10 to 15 feet | 10 to 12 feet |
| 6 inches | 12 to 18 feet, 15 feet max recommended | 12 to 15 feet |
Outdoor paving sits at the tight end of the range for two reasons. It lives through bigger swings in temperature and moisture than a floor under a roof: the top heats in the sun, cools at night and dries out while the bottom stays damp, so the panels curl and move more. And many parking lots are plain, unreinforced pavement that relies on the joints alone to control cracking. Our parking lot thickness guide uses 2 to 2.5 times the thickness, and the same NRMCA FAQ notes that ACI documents cap contraction and construction joint spacing on parking lots at 15 feet, regardless of thickness.
Thicker and reinforced floors are a different case. At 8 inches the rule of thumb gives 16 to 24 feet, past the 15-foot limit, and a slab with bars, wire, steel fibers or post-tensioning is designed to its own joint spacing. That number comes from the engineer and is on the drawings, along with the slab thickness and strength it was designed with.
A few layout habits make any spacing work better:
- Line joints up with the columns. Run joints through the column lines and divide each bay between them evenly.
- Keep panels square. Long, narrow panels tend to crack across the middle.
- Plan around the racks. If the rack plan is known, share it before the joint layout is final, so rack posts don’t sit on a joint and the main forklift aisles cross as few joints as possible.
- Cut the mesh. If the slab has welded wire mesh, NRMCA advises cutting every other wire, or stopping the mesh, at each control joint so the joint can open as designed.
When to cut control joints
Saw cutting runs against the clock. Cut too early and the blade tears out the soft concrete along the edges of the cut, which is called raveling. Cut too late and the slab may already have cracked on its own somewhere else. NRMCA gives these windows, counted from the end of finishing:
- Early-entry saws: generally 1 to 4 hours after finishing. These are light dry-cut saws with a skid plate that supports the surface at the blade to stop raveling, so they can go on the slab while it is still green. Their cuts are shallower, at least 1 inch deep.
- Conventional saws: within 4 to 12 hours after finishing. These are heavier wet or dry saws that cut to the full joint depth.
Where a slab falls in those windows depends on how fast it sets. Warm weather and fast-setting mixes move the window earlier, and cold weather pushes it later. The practical test is the edge of the cut: if it ravels, wait a little and try again.
On a large floor the challenge is volume. Leaving columns aside, a 20,000 square foot slab measuring 100 by 200 feet, jointed at no more than 15 feet each way, needs 6 cuts running its length and 13 across it: 2,500 linear feet of saw cut, all inside the same window. On laser screed pours, saw cutting usually starts the same day or night and follows the finishing across the floor, so the saws and operators have to be on site and ready before the first truck arrives. Cutting concrete raises silica dust, so the saws should run with water or a dust collector, and operators need eye and hearing protection.
How deep to cut control joints
A conventional saw cut should go at least a quarter of the way through the slab, and never less than 1 inch. Too shallow, and the crack can wander out from under the cut and show on the surface beside it.
| Slab thickness | Minimum conventional cut depth |
|---|---|
| 4 inches | 1 inch |
| 5 inches | 1-1/4 inches |
| 6 inches | 1-1/2 inches |
| 8 inches | 2 inches |
Early-entry cuts are shallower, at least 1 inch, and they work because they go in before the stresses that cause cracking have built up. On a reinforced or fiber-reinforced slab, the joint depth is part of the design.
Load transfer: dowels and dowel baskets
Once a control joint cracks, the rough faces of the crack lock together and pass some load from one panel to the next. For light traffic that interlock is enough. Under forklifts and pallet jacks it often isn’t: the joint opens as the slab keeps shrinking, the interlock loosens, and every wheel that crosses knocks the edges. The result is chipped joint edges and panels that rock.
Dowels carry the load across instead. They are smooth steel bars or plates set at mid-depth, half in each panel, so the two panels move up and down together but can still shrink apart.
- Construction joints have smooth formed faces with no interlock at all, so in traffic areas they are doweled. NRMCA advises against keyed, tongue-and-groove joints in industrial floors.
- Dowel baskets are wire cages that hold dowels in line at the right height. They are set on the base before the pour, centered on where the saw cut will go, and their locations are marked so the saw crew cuts right over them.
- Round dowels must be lined up and parallel. A crooked dowel locks the panels together and can crack the slab at its end.
- Plate dowels, flat steel plates that are square or tapered, carry the load but also let the slab move along the joint, which is why they are common at warehouse construction joints.
The same idea applies when a section of floor is torn out and replaced: dowels or load-transfer plates tie the new slab to the old one so forklifts cross without a bump. Most parking lots do without dowels. ACI’s parking lot guide says close joint spacing and aggregate interlock usually do the job, so dowels are kept for areas with heavy truck traffic.
Filling control joints in a warehouse floor
An open saw cut in a forklift aisle doesn’t last long. Hard wheels hit the unsupported edges on every pass and chip them away. Joints in traffic areas are filled with a semi-rigid epoxy or polyurea joint filler, placed the full depth of the saw cut rather than over a foam backer rod. The filler is stiff enough to support the joint edges and carry wheels across, as the Concrete Polishing Council of the American Society of Concrete Contractors explains.
A filler is not the same thing as a sealant. Flexible sealants, such as polyurethane or silicone, keep water and dirt out of outdoor joints and isolation joints, but they are too soft to hold up joint edges under hard wheels.
Timing matters as much as the product. A slab keeps drying and shrinking for years, and ACI’s floor guide, as quoted by the council, puts the most significant shrinkage in the first year, especially the first 90 days. So filling should wait as long as the schedule allows. The council cites ACI’s recommendation of a 90-day cure before filling, while most filler makers set a minimum of 28 days. Starting the building’s heating or cooling speeds the shrinkage up, so filling after the HVAC has been running is better than before.
Fast-track schedules often mean filling early. When that happens, the joints keep opening after they are filled, and the filler tears or pulls away from the joint wall. The council’s position is that this is expected and is not a failure of the filler or the installer, so the specification should say who comes back to refill the joints, and when.
Frequently asked questions
What is a control joint in concrete?
A planned weak line, usually a saw cut a quarter of the slab deep, that makes the slab crack in a straight line where it was planned instead of at random. Control joints and contraction joints are the same thing.
What is the difference between a control joint and an expansion joint?
A control joint decides where the slab cracks as it shrinks. An expansion joint, more accurately called an isolation joint, separates the slab from columns, walls, footings and other fixed objects so each can move on its own. Slabs on grade rarely need expansion joints on a grid.
How far apart should control joints be in a concrete slab?
For an unreinforced slab, 24 to 36 times the slab thickness, which is 2 to 3 times the thickness in inches, in feet. That is about 12 to 18 feet for a 6-inch floor, with 15 feet a common maximum. Parking lot paving is jointed closer, and reinforced slabs follow the engineer’s design.
When should you cut control joints in concrete?
As soon as the saw no longer ravels the edges, and before the slab cracks on its own: generally 1 to 4 hours after finishing with an early-entry saw, and within 4 to 12 hours with a conventional saw.
How deep should control joints be?
At least a quarter of the slab thickness and never less than 1 inch, so 1-1/2 inches on a 6-inch slab. Early-entry cuts are shallower but still at least 1 inch deep.
What do you fill control joints with in a warehouse floor?
A semi-rigid epoxy or polyurea joint filler, placed the full depth of the saw cut, ideally about 90 days after the pour, once most of the early shrinkage has happened. Flexible sealants are for outdoor and isolation joints, not forklift traffic.
How we plan joints on a warehouse floor
Joints work best when they are planned with everything else. Before we bid a floor, Daniel walks the site and reviews the geotech report, the mix design, the joint spacing and the FF/FL flatness spec, so the joint layout, the dowels and the saw crew are settled before the first truck arrives. See how we build warehouse and industrial floors from 10,000 to 100,000+ square feet.